Monday, August 30, 2010

Cheesecake Cupcakes

Tip:
  • Use aluminum foil cupcake liners for cheesecake cupcakes so your cheesecake does not soak through the paper liner and make a mess.
  • If you do not have sour cream on hand, use yogurt. Put yogurt into cheesecloth or coffee filter and place it over a bowl or cup making sure to have room for the liquid to drain and let sit for 30 minutes. Since sour cream is thicker than yogurt, this will allow the yogurt to become a thicker consistency and perfect for use in everything from baking to spinach and artichoke dip!

As I am sure many people are quite tired (possibly someone in my apartment??) of cupcakes everywhere, I decided to try a different spin on cup"cakes" and I was surprisingly pleased with the results partly because I don't typically like cheesecake and mostly because I forgot to set the timer and I have absolutely no sense of time!

So I bring to you,... Cheesecake Cupcakes!

Basically a blank canvas, Cheesecake Cupcakes and Vanilla Cupcakes are very much alike in that you can instantly change the flavor by choosing from a multitude of toppings. This past week, while devouring them, we have tried the Cheesecake cupcakes by themselves, topped with raspberries, topped with cool whip and raspberries, cut into pieces and drizzled with chocolate... you get the idea. Nothing failed! It was always delicious!

So here is the recipe from "125 Best Cupcakes" book by Julie Hanson with my various tweaks and notes in italic.

Cheesecake Cupcakes
  • Muffin pan for 12 cupcakes
  • 12 foil cupcake liners
CRUST:
  • 3/4 cup graham cracker crumbs (about 7 graham crackers)
  • 3 tbsp unsalted butter, melted
  • 1 tbsp packed light brown sugar
FILLING:
  • 12 oz cream cheese, at room temperature
  • 1/2 cup granulated
  • 1/4 cup sour cream
  • 2 eggs
TOPPING:
  • 1/4 cup sour cream
  • 3 tbsp granulated sugar
CRUST:
1. In a food processor, turn graham crackers into crumbs, or just crumble them yourself. I put the graham crackers into a plastic bag and with a rolling pin crushed them.
2. Mix together graham cracker crumbs, melted butter and brown sugar. To get an even consistency of the butter and sugar, I used my hands to mix the mixture together so all of the graham cracker mixture would have moisture throughout.
3. Press mixture into bottoms of prepared cupcake liners.


FILLING:

1. In a food processor fitted with a metal blade, pulse cream cheese until smooth. You don't want to overprocess the mixture; you just want it to be smooth. I used a handheld mixer for the entire filling process.
2. Add sugar, pulsing until smooth.
3. Add sour cream, pulsing until smooth.
4. Add eggs, pulsing until smooth.
5. Scoop filling over crust in foil cupcake liners.
6. Bake in preheated oven at 350 degrees for 18-22 minutes or until centers of cupcakes are firm.
7. Let cool in the pan or on a rack for 5 minutes.


TOPPING:
1. In a small bowl, stir together sour cream and sugar. I ran out of sour cream so I spooned Greek Yogurt into a coffee filter over a cup to remove the excess liquid and proceeded with using the Greek Yogurt as a substitute.
2. Gently spoon and swirl (using back of spoon) mixture over cupcakes, covering tops.
3. Return to oven and bake for 4 minutes.
4. Let cupcakes cool to room temperature.
5. Remove from pan.
6. Refrigerate for 2 hours or overnight to chill completely.

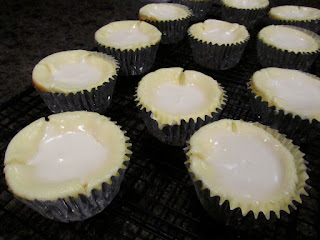

Luckily, even though I forgot to set the timer, the cheesecake tasted perfect, not over or underdone. My cheesecake cupcakes did puff up quite a bit though resulting in cracks on top and a slightly sunken in cheesecake when cooked. Maybe I over-beat the mixture, whipping too much air into the eggs and whatnot? I will try this recipe again and try not to forget I am mixing a cheesecake and not cake. Could this possibly be why the original recipe was mixed with a food processor and not a handheld mixer with beaters?

Typically with cheesecakes you should set them in a water bath so the steam and heat will help prevent curdling, cracking and over darkening of the exterior of the cheesecake but since I did not have a pan large enough to put a cupcake tin in, I could not do this. However, I do not believe this caused the cracking at the top of my cupcakes since I do not think the steam would have prevented the puff up.

Tuesday, August 24, 2010

Mini Raspberry and White Chocolate Mascarpone Whoopie Pies,..very tasty!

Tip: If you do not have buttermilk on hand, add one tablespoon of vinegar to 1 cup of milk and let stand for 10 minutes.


I made a go at my very first whoopie pies! These are not your traditional Whoopie Pies! Whoopie Pies began as a Pennsylvania Amish tradition. Made from leftover batter, they were a special treat they would send off in their children's lunch bags. Simple, neat and delicious, these dome shaped pieces of cake with a creamy middle are sure to make you call out "Whoopie!" every time you take a bite.

In some form or fashion, there are constantly cupcakes littering my entire house! The kitchen counter, the refrigerator, the microwave, the freezer, etc. I have left over practice frosting, old cupcakes for practice, cupcakes in the freezer and cupcake books scattering the house... Soner is probably beginning to feel like he walked into an alternate universe and instead of playstation and pizza, he gets Cupcake Wars and cupcakes. Poor guy! No matter how much you may like cupcakes, even I stopping licking the bowl after the first 2 or 3 experimental batches a few weeks ago!

This week I am shaking things up. No more experimental batches for the week (well maybe one more)! I will work on technique and actually baking delicious, already yummy, desserts! So yesterday I began my first foray into Whoopie Pies and if I hadn't been so high on sweets and sugar from all the cupcakes and frostings of the past week, I probably would have yelled "Whoopie!" (if only you could hear me now, I am actually testing out the way Whoopie sounds out loud with joy and excitement in my voice!).

I found this wonderfully decadent looking Whoopie Pie recipe from the Better Homes and Gardens website for Mini Raspberry and White Chocolate Mascarpone Whoopie Pies. Doesn't the name just scream out to you! These Whoopie Pies were very good. Although I did have a little trouble getting them to rise instead of spread.


Side Note:
I used an air bake cookie sheet for the first batch but a normal flat cookie sheet worked much better for these little ones. The bottom had a much better texture upon switching the pans.


Mini Raspberry and White Chocholate Mascarpone Whoopie Pies

makes 72 sandwich cookies (fairly accurate if you use a teaspoon to scoop,..I may have ended up with about 60 or so)
Ingredients
1/2 cup butter, softened

1 cup sugar

1/2 teaspoon baking soda

1/4 teaspoon salt

1 egg
1 teaspoon vanilla
2 cups all-purpose flour

1/2 cup buttermilk

1/2 cup seedless raspberry preserves
White Chocolate and Mascarpone Filling

Colored sugar (optional)


Directions
1. Preheat oven to 375 degrees F. Line a cookie sheet with parchment paper; set aside.

2. In a large bowl, beat butter with an electric mixer on medium to high speed for 30 seconds. Add sugar, baking soda, and salt. Beat until combined, scraping bowl occasionally. Beat in egg and vanilla until combined. Alternately add flour and buttermilk, beating on low speed after each addition just until mixture is combined. Spoon dough with a teaspoon, 1 inch apart onto prepared cookie sheet.


3. Bake in the preheated oven for 7 to 8 minutes or until tops are set. Cool completely on parchment-lined cookie sheet on a wire rack. Peel cooled cookies off the paper. Spread the flat side of half of the cookies with about 1/4 teaspoon raspberry preserves. In a large pastry bag fitted with a small star tip, pipe White Chocolate and Mascarpone Filling over the raspberry preserve layer. Top with the remaining cookies, flat sides down. If desired, pipe additional filling on top of whoopie pies and/or sprinkle with colored sugar. Chill for 30 minutes before serving. Makes about 72 sandwich cookies.

White Chocolate and Mascarpone Filling:
In a heavy small saucepan, combine 3 ounces chopped white baking chocolate (with cocoa butter) and 1/4 cup whipping cream. Cook and stir over low heat until chocolate nearly melts. Remove from heat; stir until smooth. Cool for 15 minutes. Meanwhile, in a large bowl, combine 1/2 cup mascarpone cheese and 1/4 cup softened butter. Beat with an electric mixer on medium to high speed until smooth. Beat in 1/2 teaspoon vanilla. Gradually add 4 cups powdered sugar, beating well. Beat in the cooled white chocolate mixture. Chill about 30 minutes or until firm enough to pipe.


To Store:
Place bars in a single layer in an airtight container; cover. Store in refrigerator for up to 3 days or freeze for up to 3 months. Thaw at least 1 hour in refrigerator before serving.


Make sure to melt chocolate and cream on low so as not to burn. Burnt white chocolate tastes likes burnt not-so-goodness.

Wait until the mascarpone cheese reaches room temperature or it may not blend smoothly with the butter.


Add a little powdered sugar at a time to avoid sugar flying everywhere!!

The Mascarpone Cheese before adding the White Chocolate would make a great frosting!

White Chocolate Mixture added in.

You get a wonderfully creamy and smooth mixture that you must refrigerate for about 30 minutes so it will pipe out beautifully.

A little flat but they taste very cake-y and delicious!

Raspberry Preserves spread on every other half.

These Whoopie Pies were absolutely delicious. They were a bit flat but they were the perfect bite size treat. I probably polished off about 4 or 5 before Soner got home just to make sure "they tasted good." I definitely need to figure out why they spread so much and how to make perfectly round pieces because I really enjoyed the taste and would love to make them again. I used a rounded teaspoon and tried to fill it with exactly the same amount each time but the sizes and shapes of the Whoopie Pies never were consistent.

I look forward to trying out more of these treats. I loved the Whoopie Pie almost as much as cupcakes because each "pie" yielded the perfect ratio of sweet fillings to cake. If I could find some fancy way to decorate them, they may become my newest favorite baking item although they do take quite a lot of time and effort.

Side Note: Can anyone tell me why the cake tops were sticky to the touch? My cupcakes sometimes come out like this also. I baked them for the recommended time and actually baked one batch for longer to see if the flattening of the cakes was a structural problem (possibly it fell flat upon taking out of oven because it wasn't finished forming its structure??)

Friday, August 20, 2010

Ladybug Cupcakes: They are cute-sy but I love them!

Wanting to actually complete an entire cupcake, top hat and all, I did a lot of mixing and baking yesterday! After a quick trip to Michael's Craft Store for some Meringue Powder, Black Gel and Frosting Tips and another trip to CVS for M&Ms (dark chocolate so, of course, they are healthy!), Twizzlers Nibblers and Pretzel M&Ms (I needed these very badly to complete my cupcakes..my replacement snack in place of snacking on frosting and cupcake batter!), I was armed and ready.


I began with half a Meringue Buttercream Frosting recipe just for taste-testing purposes and playing with my new and old tips. The Meringue with the shortening has absolutely no appeal to my "delicate" palate so it is now a practice-only frosting stored in my fridge! Surprisingly, I actually quite missed the typical butter-y taste found in Buttercreams. The consistency was great though so maybe I will try a mixture of half shortening and half butter if I can drag myself away from the buttercream I am finally getting the hang of making!


Side Note: I am trying to form leaves with leaf tip #67 and it does not appear to
be working! Every time I pull away to form the point of the leaf, the result is broken edges. How do I remedy this??


Wilton's Meringue Powder Buttercream Frosting Recipe


(for flowers with upright petals)
1 teaspoon Clear vanilla extract*
2 tablespoons Water
1 cup Shortening
1 tablespoon Wilton Meringue Powder
1 pounds Sifted powdered sugar (approx 4 cups)

(for borders, flowers with petals that lie flat)
1 tablespoon Additional water

(for writing, making stems and leaves & frosting a cake)
2 tablespoons Additional water

STIFF: MEDIUM: THIN: *Note: Clear butter & clear almond extracts can be included with or substituted for the vanilla. Flavorings can be up to a total of 2 t. DIRECTIONS: Sift the powdered sugar and meringue powder into a large mixing bowl and set aside. Cream shortening, flavorings and water. Gradually add sifted dry ingredients and mix on medium speed until all ingredients have been thoroughly mixed together. Blend an additional minute or so until creamy.

I baked 24 cupcakes using "My" Vanilla Cupcake recipe. While I thought this was a recipe I really enjoyed, it is not quite as moist the 2nd day while the original Magnolia Bakery Vanilla Cupcake recipe tasted the same to me over a period of days. I will have to go back to the drawing board on that one!

For the buttercream frosting, I used the same recipe I have been using as of late with a touch less than 1/2 teaspoon of almond oil as the flavor was a bit too strong last time. The consistency was nice and thick! I added green gel food coloring to the mixture and continued adding until I achieved a grassy green coloring.

For the ladybugs: Martha Stewart recommends tinted marzipan but I was in no mood to tint my fingers red so I played with red M&Ms and Twizzlers Nibblers. The Nibblers are almost square with no texture on top. I thought if I could round off the edges they would be the perfect ladybugs but then I realized an M&M already works perfect so why fix something if it "ain't" broke?!

Armed with black gel and red M&Ms, I closed my eyes and turned around 3 times then Voila! I miraculously had little red ladybugs. Be sure to do the ladybugs ahead of time so the gel can harden a little.


For the grass: I very lightly frosted the cupcakes before I began the grass to give the frosting something to grab onto. You do not have to do this, however, I found when I did not take this step, the "grass" sometimes did not adhere when I pulled away. Using Wilton tip #233, I formed grass after grass after grass and it was beautiful! Like looking at a green as green can be putting green. Place the ladybugs on the frosting quickly before it begins to set or they will not adhere or at the end you can add a few more pieces of grass and adhere the ladybugs.


I absolutely loved these cupcakes. While they are quite cute-sy and not very manly, I am a girl so I get to be girly. If you would like to place put your manliness on hold for just a moment, you are more than welcome to enjoy these Ladybug Cupcakes! Afiyet Olsun!

Wednesday, August 18, 2010

Vanilla Cupcake Recipe Courtesy of Me!

My very own cupcake recipe is finally beginning to take shape. I have been working with the Magnolia Bakery Vanilla Cupcake recipe, tweaking different its and bits until I have a recipe I am in love with. My requirements: super moist, dense cake, not too sweet and must taste delicious. While many people may prefer a light, fluffy cupcake, I prefer mine fairly dense and sponge-y to complement the rich frostings I like to use.

Here's my recipe thus far!

Vanilla Cupcake (courtesy of Me)

93.75 grams self-rising flour
78 grams all-purpose flour
1/4 cup butter
1/4 cup vegetable oil
225 grams (1 cup) granulated sugar
2 eggs
1/2 teaspoon Vanilla Extract
1/2 cup Milk

1. Combine self-rising flour and all-purpose flour in small bowl. Set aside. I prefer to whisk the flours together to ensure they are evenly mixed.
2. In another bowl, beat butter (room temperature, not melted) then add sugar and cream together for about 1 minute on medium speed.
3. Add vegetable oil and beat for another 2 minutes.
4. Add eggs (room temperature) 1 at a time and continue mixing until each is well incorporated.
5. Combine vanilla extract and milk (room temperature).
6. Alternate adding flour and milk, beginning and ending with flour. Do not over beat!
7. Spoon batter into cupcake liners, 3/4 full.
8. Bake at 350 degrees for 22 minutes.
9. Cool 15 minutes in pan then remove to cool completely.

This cupcake recipe is still in its infant stages but I enjoy it.

Tuesday, August 17, 2010

A Turkish Spin: Pistachio Cream Filled Cupcakes with Buttercream Frosting

The weekend went by in a cooking blur or at least Saturday did. We started off our day with a run to the Farmer's Market in Troy and rounded it out with an entire afternoon and evening of peeling, chopping, sifting, baking, and cooking. Yes, we were preparing a Turkish Dinner... what other dinner requires so much time and preparation? Thank goodness the eating of a typical Turkish Dinner can last for hours!

Our Turkish Menu:
Tomato Soup
Salad
Lentil Balls
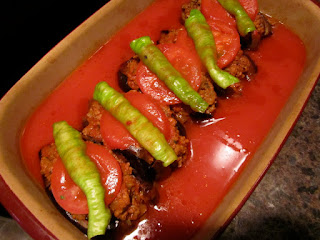
Karniyarik (Stuffed Eggplant with Ground Beef
Pilav (Turkish Rice)
Pistachio Cupcakes

I could not have asked for a better dinner (unless I was in Turkey) or better company. You will never truly understand food, its tastes, textures and smells until you have literally put your hands into the thick of it and that is what Turkish food is all about..it is basically a love affair with food. Getting your hands messy and taking the time to fill each with love.

Tomato Soup with Fried Mint Sauce

Lentil Balls

My favorite! Karniyarik

During all this hard work and preparation, I focused on the cupcakes! I wanted to create a cupcake with a nod towards Turkish food using a fairly basic recipe so if all fails, I could still enjoy a plain Vanilla Cupcake.

All Pistachio based recipes are my own concoction so please if you enjoy them, pass it around but give credit where credit is due. I researched online but was unable to find any recipes for pistachio filling whether it be for Cupcakes, Macoroons, Pies, etc. Enjoy!

Pistachios are used in all things good in Turkey! Baklava, Turkish Delight, Marzipan, etc.

Pistachio Cream Filled Cupcakes with Pistachio Buttercream Frosting

Pistachio Cream (Courtesy of Me)

You will need:
4 tablespoons Whipping Cream
3/4 ounce of shelled pistachios
1/4 cup butter
1/2 pound confectioners sugar
Extra Whipping Cream
Extra shelled pistachios

This is the fun part! To begin you must prepare unsalted pistachios by shelling them, then de-skining them.
1. Shell the pistachios then soak in boiling water for 15 minutes to loosen the skins. While tedious as this may seem, it is necessary to fully appreciate the pistachios.
2. In saucepan, add your 4 tablespoons Whipping Cream and shelled pistachios, bring to a boil and boil for 2 minutes until Whipping Cream has reduced (continuously stir to keep from burning)
3. Transfer pistachio mixture to a blender and let cool for a few minutes. Puree. Do not worry if you have still have its and bits of visible pistachios pieces.
4. In a mixing bowl, beat your room temperature butter to a creamy consistency then slowly add your sifted powdered sugar.
5. Add your pureed pistachio mix to frosting and continue to beat with mixer until well blended.

At this point, you should have a Pistachio Buttercream Frosting.

6. Add more whipping cream until you reach the desired consistency for your filling cream. I added 3 tablespoons of Whipping Cream. Add additional chopped pistachios (not pistachio mixture) if you want a stronger pistachio taste and a little crunch.

Yields enough filling for 24 cupcakes at 2 teaspoons each.


Side Note: The difference between the Pistachio Filling and Pistachio Frosting is the consistency and taste. I wanted to top my cupcakes with a Vanilla Buttercream Frosting but the flavor was too sweet so I decided to add a light pistachio flavoring with the slight sweetness of Almond Extract.


Pistachio Buttercream Frosting (courtesy of Me)

You will need:
1/2 cup butter (1 stick)
1 pound confectioner's sugar
1/2 teaspoon Almond Extract
1 ounce Pistachios

1. Blend butter and sifted confectioner's sugar then add 1/2 teaspoon of Almond Extract.
2. In your blender, puree your pistachios until you have fine pieces of Pistachio.
3. Add pistachio pieces to buttercream frosting.

Yields enough frosting for 12 cupcakes.

Vanilla Cupcake Recipe (courtesy of Magnolia Bakery)
Ingredients:

* 1 1/2 cups self-rising flour
* 1 1/4 cups all-purpose flour
* 1 cup (2 sticks) unsalted butter, softened
* 2 cups sugar
* 4 large eggs, at room temperature
* 1 cup milk
* 1 teaspoon vanilla extract (I did equal parts Almond Extract and Vanilla Extract to equal 1 teaspoon)


Directions

Preheat oven to 350 degrees F.

Line 2 (1/2 cup-12 capacity) muffin tins with cupcake papers.

In a small bowl, combine the flours. Set aside.

In a large bowl, on the medium speed of an electric mixer, cream the butter until smooth. Add the sugar gradually and beat until fluffy, about 3 minutes. Add the eggs, 1 at a time, beating well after each addition. Add the dry ingredients in 3 parts, alternating with the milk and vanilla. With each addition, beat until the ingredients are incorporated but do not over beat. Using a rubber spatula, scrape down the batter in the bowl to make sure the ingredients are well blended. Carefully spoon the batter into the cupcake liners, filling them about 3/4 full. Bake for 20 to 25 minutes, or until a cake tester inserted into the center of the cupcake comes out clean.

Cool the cupcakes in tins for 15 minutes. Remove from the tins and cool completely on a wire rack before icing.

To Assemble:

Take a small knife and cut out a conical shape from cupcakes. Remove. Fill hole with Pistachio Cream Filling. Cut tops of the piece your removed from the cupcakes off and replace on top of the cupcake (this is to prevent your frosting from caving in in case your filling seeps into the cupcake and creates a void) Frost with Pistachio Buttercream Filling and top with pistachio pieces and Voila!


Aging Beef: The Monumentous Occasion

We aged beef.

We succeeded in our experiment and it looked absolutely lovely.

The steak was super tender.

The results were great.

The steak was... not as tasty as I had hoped! This was a nice experiment, it was interesting to watch the steak slowly form an outer "crust" as it aged and it was super cool "squeezing" it from time to time and being able to feel a difference in tenderness, however, the end result was not nearly as good as I imagined. We did succeed but I think I'd prefer to tenderize my steaks with a bit of Coke before I make myself remember everyday to baby the steak. C'est la vie!